


MySQL is the world’s most widely used relational database management system (RDBMS), boasting over 40% market penetration. It’s the backbone of many cloud-based applications we interact with daily.
Released as open-source software in 1996, MySQL has maintained its open-source status even after being acquired by Oracle.

Stay One Step Ahead of Cyber Threats
As an enthusiastic supporter and frequent user of MySQL, I’m excited to share some essential commands that are invaluable in day-to-day operations.
This article aims to provide a quick overview of frequently used and important MySQL commands. For those seeking more detailed information, numerous resources are available online. Often, we just need a quick refresher on how a command is used, and this guide serves that purpose.
Is MySQL Installed?
Before diving into commands, ensure MySQL is installed on your system. For Ubuntu users, the installation is straightforward:
$ sudo apt update
$ sudo apt install mysql-server
$ sudo mysql_secure_installation
Securing your MySQL installation is paramount. The mysql_secure_installation script helps you safeguard your installation by restricting anonymous access, removing the test database, and strengthening your MySQL account passwords.
MariaDB note: The above commands install MySQL, however, a popular alternative is MariaDB, developed by the original MySQL team. The commands in this guide apply to both MySQL and MariaDB.
Important MySQL Commands
1. Logging In (Without Specifying Your Password on the Command Line)
To access the MySQL command-line client with administrative privileges, use:
$ sudo mysql -u root -pHere, -u specifies the user, and -p prompts for a password.
2. Viewing Databases
mysql> show databases;3. Creating a New Database
mysql> create database recipes;4. Selecting a Database:
mysql> use recipes;5. Creating a New Table:
mysql> create table if not exists italian (
         italian_id int auto_increment primary key,
         title varchar(75) not null,
         recipe varchar(255) not null,
         date_recipe_discovered date,
         record_created_at timestamp default current_timestamp
       );
6. Creating a New User:
mysql> create user luigi@localhost identified by '7c1fcec29adac4b2a8b157c21';7. Granting Permissions:
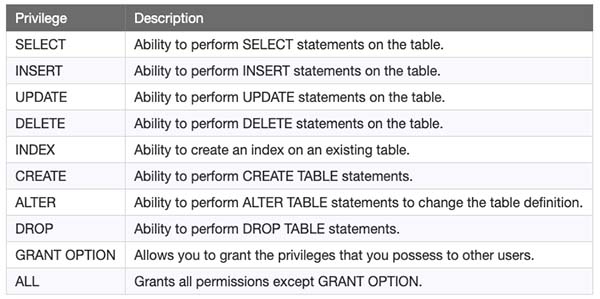
A best practice is only to provide the most restrictive permissions necessary; for our demo, let’s look at two options: one where we specify limited permissions and one where we give a user all of them.
Limited permissions on the recipes database:
mysql> grant create, select, insert, update, delete on recipes.* to 'luigi'@'localhost';All permissions on the recipes database:
mysql> grant all on recipes.* to 'luigi'@'localhost';8. Revoking Permissions:
mysql> revoke all on recipes.* from 'luigi'@'localhost';9. Viewing User Permissions:
mysql> show grants for 'luigi'@'localhost';10. Removing a User
mysql> drop user 'luigi'@'localhost';11. See Your MySQL Users
To view all users in your MySQL installation:
mysql> select user, authentication_string, plugin, host from mysql.user;MySQL, by default, reserves 4 user accounts – mysql.session, mysql.sys, debian-sys-maint, and root. The others are the ones you (or another admin) created.
According to the MySQL documentation, the users — mysql.session and mysql.sys, are locked and can’t be used for client connections. This is why you see the value “*THISISNOTAVALIDPASSWORDTHATCANBEUSEDHERE” under the column labeled “authentication_string.”
The debian-sys-maint account is used by MySQL to control the service.
And lastly, your “root” user is your system-wide administrative account. By default, it’s set with a login method of “auth_socket,” which effectively means you have to use “sudo” to log in. This is more secure and a best practice.
You could issue the following command to change this, although I’d personally recommend against it.
12. Changing Root Login Method
While not recommended, you can change the root account login method:
mysql> alter user 'root'@'localhost' identified with mysql_native_password by 'your-password-here';
mysql> flush privileges;
If you do this, run sudo mysql_secure_installation again to ensure your installation remains secure. You can now log in with the root user without using sudo.
I’d like to caution you again; please have a good reason for changing your root account login method, as it’s not a best practice.
13. Password Policy in MySQL
To view MySQL’s password policy:
mysql> show variables like 'validate_password%';"Amateurs hack systems, professionals hack people."
-- Bruce Schneier, a renown computer security professional


")
